TL;DR:
- Coastal bathroom renovation involves selecting durable materials and proper waterproofing to withstand salt, humidity, and UV exposure. It prioritizes functional design choices like porcelain tiles and corrosion-resistant fixtures over aesthetics alone, ensuring long-term durability. Regular maintenance and thorough site assessment are essential for preserving the renovation’s integrity in coastal environments.
Coastal bathroom renovation is defined as the process of transforming a bathroom using materials, layouts, and systems engineered to withstand salt air, humidity, and UV exposure while delivering a beach-inspired aesthetic. This is not simply decorating with seashells and blue paint. It is a climate-responsive construction discipline where material performance against coastal conditions determines whether your renovation lasts five years or twenty-five. Homeowners in Monmouth and Ocean County face specific challenges that inland renovations never encounter, from salt crystallization in grout lines to corrosion on metal fixtures within months of installation. Getting this right requires understanding materials, layout, waterproofing, and maintenance as one integrated system.
What does coastal bathroom renovation involve at its core?
A coastal bathroom renovation involves four interconnected decisions: material selection for salt and moisture resistance, layout optimization for ventilation and natural light, waterproofing and structural preparation, and a maintenance plan that protects the investment long-term. Coastal design prioritizes building envelope performance against salt, UV, and moisture over pure aesthetics, because neglecting durability leads to premature material failure regardless of how beautiful the initial result looks. Homeowners who treat this as a standard bathroom remodel consistently underestimate the damage that salt-laden air and persistent humidity inflict on conventional materials.
The distinction between a coastal renovation and a standard one shows up most clearly in the specification sheet. Porcelain tiles replace natural stone. Epoxy grout replaces cementitious grout. Brushed stainless or powder-coated fixtures replace chrome. Every substitution has a functional reason, not just a stylistic one. Understanding this logic before you start planning saves you from costly replacements within the first few years.
What materials and fixtures best suit coastal bathrooms?
Porcelain and ceramic tiles with epoxy or mold-resistant grout are the industry standard in coastal bathrooms because they resist moisture absorption, salt staining, and mold growth far better than natural stone or standard cementitious grout. Standard grout requires frequent sealing and degrades quickly under salt exposure, making it a poor choice for any bathroom within a mile of the ocean. Porcelain, with its low porosity and dense composition, is the most practical tile material available for this application.
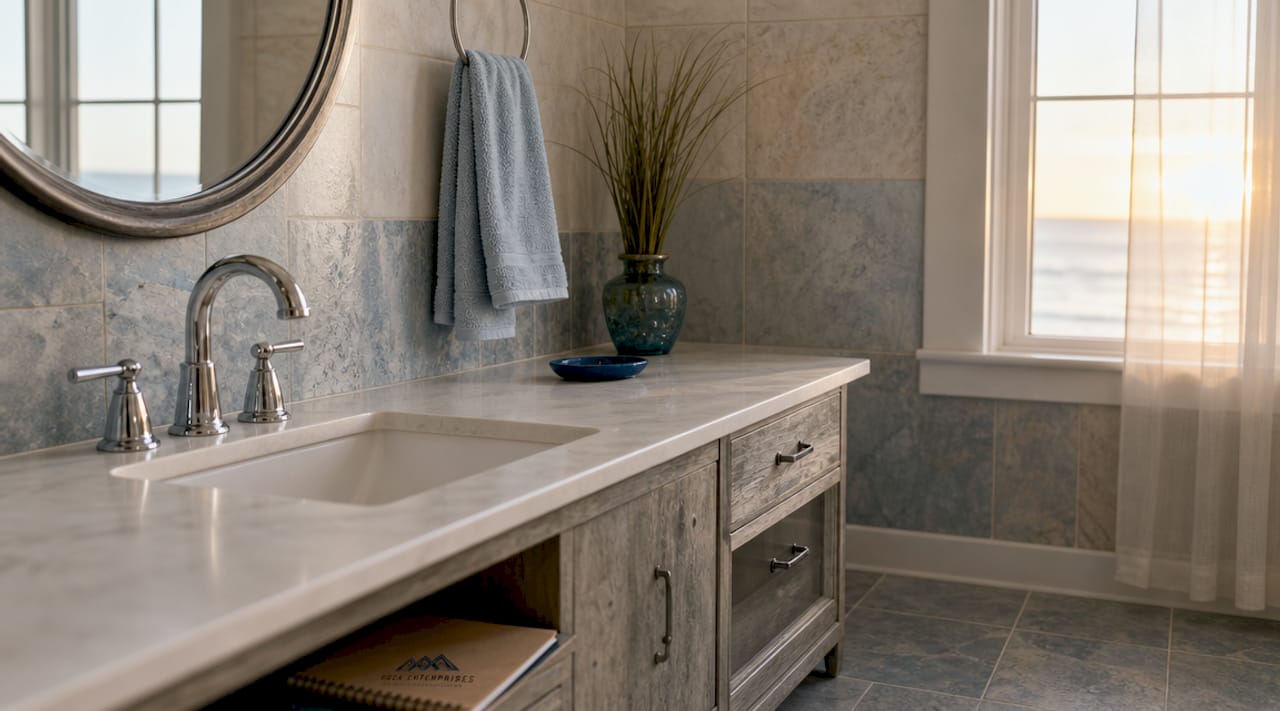
Fixtures and tapware deserve equal attention. Corrosion-resistant tapware and moisture-resistant cabinetry are non-negotiable in salt-air environments because standard metallic finishes and untreated wood deteriorate rapidly without protective properties. Brushed nickel, marine-grade stainless steel, and powder-coated aluminum all outperform standard chrome in coastal conditions. For cabinetry, PVC, marine-grade plywood with sealed edges, or moisture-resistant MDF with a hard lacquer finish are the practical choices.
| Material | Durability in coastal conditions | Maintenance level |
|---|---|---|
| Porcelain tile | Excellent, low porosity resists salt | Low, wipe clean, no sealing needed |
| Ceramic tile | Good, slightly more porous than porcelain | Low to moderate, periodic sealing |
| Epoxy grout | Excellent, non-porous, mold resistant | Very low, no sealing required |
| Cementitious grout | Poor, absorbs salt and moisture | High, frequent sealing and replacement |
| Marine-grade stainless fixtures | Excellent, resists oxidation | Low, occasional polish |
| Standard chrome fixtures | Poor, corrodes within months near salt air | High, frequent replacement |
| Moisture-resistant MDF cabinetry | Good with sealed edges | Moderate, inspect seals annually |

Pro Tip: Select tiles with a PEI rating of 4 or higher and a water absorption rate below 0.5% for floors in coastal bathrooms. These specs appear on the manufacturer’s data sheet and are the fastest way to verify a tile is genuinely suitable for high-moisture, high-traffic coastal use.
You can explore bathroom renovation styles for 2026 to compare how coastal specifications fit within broader design trends before committing to a direction.
How does natural light and layout influence coastal bathroom design?
Maximizing natural light through windows and skylights is a defining feature of coastal bathrooms because sunlight enhances the open, airy feeling while actively supporting moisture management by reducing the damp conditions that mold requires. This makes window and skylight placement a functional decision, not just an aesthetic one. A bathroom that feels bright and spacious is also a bathroom that dries faster and stays healthier.
Layout in a coastal bathroom follows a wet zone and dry zone logic. Placing the shower, tub, and sink in one concentrated wet zone reduces the spread of moisture across the room and makes waterproofing more targeted and effective. The dry zone, where storage and vanity areas sit, benefits from better air circulation when positioned near windows or ventilation outlets.
Key layout and light considerations for coastal bathrooms include:
- Window placement: Position windows high on walls or use frosted glass to bring in light without sacrificing privacy, and orient them to capture prevailing sea breezes for passive ventilation.
- Skylights: Tubular skylights work well in bathrooms where wall windows are not feasible, delivering daylight without the structural complexity of a full skylight cut.
- Wet and dry zone separation: Keep plumbing fixtures grouped together to concentrate waterproofing efforts and reduce moisture migration to cabinetry and flooring.
- Ventilation fan placement: Install exhaust fans directly above the shower or tub, not in the center of the ceiling, to capture steam at its source before it spreads.
- Outdoor shower access: Coastal homes near the beach benefit from a dedicated outdoor shower or deck rinse station connected to the main bathroom, reducing sand and salt tracked indoors.
Pro Tip: Pair your exhaust fan with a humidity sensor rather than a manual switch. Humidity-sensing fans run automatically when moisture levels spike and shut off when the air clears, which is far more effective than relying on occupants to remember to run the fan long enough.
What renovation processes are unique to coastal bathrooms?
Coastal bathroom renovation follows a specific sequence that differs from standard remodeling because structural and moisture issues must be resolved before any cosmetic work begins. Thorough site assessments for moisture intrusion and salt damage are the mandatory first step, because structural reinforcement and waterproofing must precede cosmetic upgrades to guarantee durability. Skipping this step is the single most common cause of premature renovation failure in coastal homes.
The renovation process for a coastal bathroom follows this sequence:
- Site assessment: Inspect subfloor, wall framing, and existing plumbing for moisture damage, rot, and salt corrosion. Use a moisture meter to identify hidden water intrusion before demolition begins.
- Demolition: Remove existing tile, fixtures, and cabinetry carefully to expose the substrate. Document any structural damage found during this phase.
- Structural reinforcement: Replace rotted framing, reinforce floor joists if needed, and address any subfloor deflection that would crack new tile over time.
- Waterproofing membrane installation: Apply a continuous waterproofing membrane to all wet zone surfaces, including floors, shower walls, and the lower 12 inches of adjacent walls. RedGard, Schluter Kerdi, and Laticrete Hydro Ban are proven products for this application.
- Plumbing rough-in: Upgrade supply lines to PEX or CPVC, which resist corrosion better than copper in salt-air environments. Replace any corroded drain hardware at this stage.
- Electrical and ventilation rough-in: Coordinate ventilation placement and electrical work to position exhaust fans correctly and wire GFCI outlets at all wet zone locations.
- Tile installation: Set tile using a polymer-modified thinset rated for wet areas, apply epoxy grout, and seal all transitions with a flexible silicone caulk rated for continuous moisture exposure.
- Fixture and cabinetry installation: Install corrosion-resistant fixtures, moisture-resistant cabinetry, and all finish hardware.
- Final inspection: Check all seals, test plumbing for leaks, verify ventilation airflow, and confirm all electrical work meets code.
Working with a licensed contractor in NJ shore towns matters at every stage of this process because coastal building codes in Monmouth and Ocean County include specific requirements for waterproofing and ventilation that unlicensed contractors frequently miss.
How to maintain and prolong the life of a coastal bathroom renovation
Regular maintenance including grout sealing, caulking inspection, and ventilation upkeep prevents mold and corrosion from shortening the life of a coastal bathroom renovation. Neglecting these tasks increases damage risk from moisture and salt, turning a preventable maintenance issue into a full replacement project. A simple annual inspection schedule protects your investment more effectively than any single material upgrade.
Maintenance priorities for a coastal bathroom include:
- Grout inspection and sealing: Even epoxy grout benefits from an annual visual inspection. If you used cementitious grout in any area, seal it every 12 months with a penetrating silicone sealer.
- Caulk line checks: Inspect all caulk joints at the tub surround, shower base, and vanity backsplash twice a year. Cracked or discolored caulk is an entry point for moisture and must be replaced immediately.
- Ventilation system cleaning: Clean exhaust fan grilles and impellers every six months to maintain airflow efficiency. A clogged fan running at reduced capacity is nearly useless against coastal humidity.
- Fixture corrosion monitoring: Check all metal fixtures, drain covers, and hardware for early signs of oxidation or pitting. Catching corrosion early allows for protective coating rather than full replacement.
- Tile surface cleaning: Use a pH-neutral cleaner on porcelain and ceramic tile. Acidic cleaners, including vinegar-based products, degrade grout and sealants over time.
For broader coastal property upkeep, the guidance on deck renovation in coastal New Jersey applies many of the same maintenance principles to exterior surfaces.
What coastal bathroom design ideas enhance aesthetics and function?
The features of coastal bathrooms that work best combine visual calm with practical performance. Large-format tiles reduce grout lines, which decreases moisture traps and salt crystallization while giving the floor and walls a cleaner, more expansive look. Textured or matte finishes on floor tiles improve slip resistance in wet, sandy conditions common near the coast, addressing a safety concern that glossy tiles ignore.
Effective coastal bathroom design ideas include:
- Color palette: Soft whites, warm sand tones, seafoam greens, and muted navy blues create the coastal mood without requiring nautical props. These colors also reflect light well, amplifying the effect of natural light sources.
- Shiplap accent walls: Painted shiplap in a moisture-resistant finish adds texture and a beach-house character to the dry zone wall behind the vanity. Use PVC shiplap rather than wood in high-humidity spaces.
- Natural fiber accents: Jute bath mats, woven baskets for storage, and linen window treatments bring organic texture without requiring structural changes.
- Lighting fixtures: Brushed nickel or matte white fixtures with a warm color temperature (2700K to 3000K) support the relaxed coastal mood while providing functional task lighting at the vanity.
- Modern versus traditional coastal: Modern coastal bathrooms favor large-format white or gray porcelain, minimal hardware, and frameless glass shower enclosures. Traditional beach house style leans toward subway tile, beadboard, and vintage-inspired fixtures in brushed brass or oil-rubbed bronze.
The role of tile work in coastal home renovation extends beyond aesthetics. Tile selection directly determines how well the bathroom resists moisture, how easy it is to clean, and how long the renovation holds up before requiring repairs.
Key takeaways
A successful coastal bathroom renovation depends on treating material selection and moisture management as the foundation, with design choices built on top of that structural logic.
| Point | Details |
|---|---|
| Material selection is structural | Porcelain tile, epoxy grout, and corrosion-resistant fixtures prevent premature failure in salt-air environments. |
| Waterproofing precedes all finishes | Apply continuous waterproofing membranes to all wet zone surfaces before any tile or fixture installation. |
| Natural light serves two functions | Windows and skylights create the coastal aesthetic and actively reduce moisture buildup that causes mold. |
| Maintenance is part of the renovation | Annual grout inspection, caulk replacement, and ventilation cleaning protect the renovation investment long-term. |
| Large-format tiles reduce risk | Fewer grout lines mean fewer moisture traps, improving both longevity and slip resistance in coastal bathrooms. |
What I’ve learned from coastal bathroom renovations
After working on bathrooms across Monmouth and Ocean County, the pattern I see most often is homeowners prioritizing the look before confirming the substrate is sound. They choose tile colors before anyone has checked whether the subfloor has moisture damage. That sequence almost always costs more in the end.
The most common misconception I encounter is that coastal renovation is just standard renovation with different paint colors. It is not. The salt air in this region is genuinely aggressive. I have seen chrome fixtures show visible corrosion within six months of installation in homes a few blocks from the water. The fix is not more cleaning. It is specifying the right material from the start.
Budget conversations matter here too. Homeowners sometimes push back on epoxy grout because it costs more than standard grout. But when you factor in the resealing labor and eventual grout replacement that cementitious grout requires in a coastal environment, epoxy is cheaper over a ten-year period. The upfront cost is the investment. The ongoing cost is the savings.
My honest advice: get a site assessment before you finalize any design decisions. What you find in the walls and subfloor should drive your material and waterproofing budget, not the other way around. A contractor who skips this step is not saving you time. They are deferring a problem you will pay to fix later.
— ryan
Ready to renovate your coastal bathroom?
Rockenterprisecontracting brings hands-on expertise to coastal bathroom renovations across Monmouth and Ocean County, with the owner personally overseeing every project from site assessment through final inspection. The team handles material selection, waterproofing, tile installation, plumbing coordination, and finish work as a single integrated process, so nothing falls through the cracks between trades.

If you are planning a coastal bathroom renovation and want guidance on materials, layout, and what the process actually involves for your specific home, the home renovation guide from Rock Enterprises is a strong starting point. You can also review the completed renovation portfolio to see the quality of work delivered in homes similar to yours. Contact Rockenterprisecontracting directly for a personalized consultation and transparent pricing on your coastal bathroom project.
FAQ
What makes a coastal bathroom renovation different from a standard one?
A coastal bathroom renovation requires materials and construction methods specifically rated for salt air, high humidity, and UV exposure. Standard renovations do not account for the accelerated corrosion and moisture damage that coastal environments produce.
What type of tile is best for a coastal bathroom?
Porcelain tile with a water absorption rate below 0.5% and a PEI rating of 4 or higher is the best choice for coastal bathrooms. Paired with epoxy grout, it resists salt staining, moisture absorption, and mold growth far better than ceramic or natural stone.
How often should grout be sealed in a coastal bathroom?
Epoxy grout requires no sealing, which is why it is preferred in coastal bathrooms. If cementitious grout is present, seal it every 12 months with a penetrating silicone sealer to prevent salt and moisture intrusion.
Do I need a site assessment before renovating a coastal bathroom?
Yes. A site assessment for moisture intrusion and salt damage is the required first step in any coastal bathroom renovation. Structural reinforcement and waterproofing decisions depend on what the assessment reveals beneath existing surfaces.
What fixtures hold up best in salt-air environments?
Brushed nickel, marine-grade stainless steel, and powder-coated aluminum fixtures resist corrosion in salt-air environments. Standard chrome corrodes rapidly near the coast and requires frequent replacement without protective coatings.